Three Makeup Tricks and Tips
By: Jacquelyn Huynh
Wearing makeup can be a daunting, risky feat. The slightest slip of the hand can ruin your whole morning’s work, and what’s more annoying than having to start all over? These three tips will help you not only avoid common makeup mistakes, but also
will help you achieve that perfect look you’re going for.
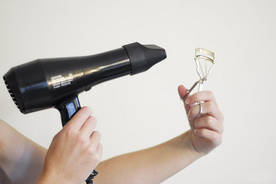
1. DIY Heated Eyelash Curler: If your lashes don’t curl well, this is the trick for you. Heated eyelash curlers can be found in stores for around $15, not including the cost of replacing batteries, but why pay all that money when you can get the same effect using your own regular curler? Similarly to how a curling iron or flat iron works on your hair, you can just heat up your eyelash curler to get a faster, more defined curl on your lashes. Just start up your hair dryer and hold your eyelash curler in the heat for up to 5 seconds (holding it longer can put you at risk to burning your eyelids!). After heating your curler, go ahead and curl your lashes as you normally would. Your DIY heated eyelash curler should not only make curling your lashes faster but give you a more defined, longer-lasting curl.
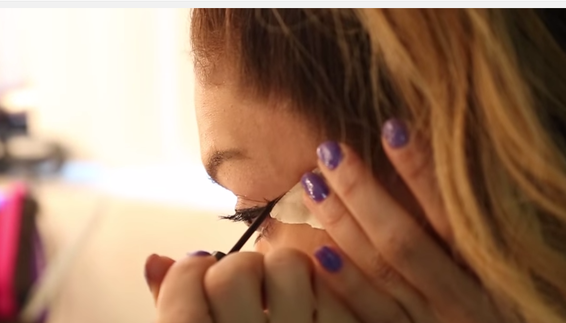
2. Mascara Shield: Ever have that problem where your hand twitches while you’re applying mascara and you get it all over your eyelids or on your eye shadow? To avoid this, simply take a business card or index card and cut an arch or semi-circle near the corner. Match this up to the curve of your eyelid and apply mascara as you normally would. Excess mascara that would have ruined your eye shadow now gets onto the card.
3. Eyeliner Guideline: Getting the perfect wing with your eyeliner can be frustrating, especially trying to get one eye’s wing to match the other. This can easily be fixed by using regular Scotch tape (please make sure to use regular clear or Scotch tape--using tape with too strong of an adhesive can pull at the skin of your eyes and ultimately create wrinkles over time) to create a guideline for your liner. Simply take a piece of Scotch tape and tape it to a clean patch of skin, such as your wrist or hand to weaken the adhesive, then reapply it to the corner of your eye. Apply your eyeliner, following the line of the tape, and repeat on the other eye, reversing the tape. In seconds, you’ll have a perfect eyeliner wing, and you’ll be ready to tackle on the day.
Wearing makeup can be a daunting, risky feat. The slightest slip of the hand can ruin your whole morning’s work, and what’s more annoying than having to start all over? These three tips will help you not only avoid common makeup mistakes, but also
will help you achieve that perfect look you’re going for.
1. DIY Heated Eyelash Curler: If your lashes don’t curl well, this is the trick for you. Heated eyelash curlers can be found in stores for around $15, not including the cost of replacing batteries, but why pay all that money when you can get the same effect using your own regular curler? Similarly to how a curling iron or flat iron works on your hair, you can just heat up your eyelash curler to get a faster, more defined curl on your lashes. Just start up your hair dryer and hold your eyelash curler in the heat for up to 5 seconds (holding it longer can put you at risk to burning your eyelids!). After heating your curler, go ahead and curl your lashes as you normally would. Your DIY heated eyelash curler should not only make curling your lashes faster but give you a more defined, longer-lasting curl.
2. Mascara Shield: Ever have that problem where your hand twitches while you’re applying mascara and you get it all over your eyelids or on your eye shadow? To avoid this, simply take a business card or index card and cut an arch or semi-circle near the corner. Match this up to the curve of your eyelid and apply mascara as you normally would. Excess mascara that would have ruined your eye shadow now gets onto the card.
3. Eyeliner Guideline: Getting the perfect wing with your eyeliner can be frustrating, especially trying to get one eye’s wing to match the other. This can easily be fixed by using regular Scotch tape (please make sure to use regular clear or Scotch tape--using tape with too strong of an adhesive can pull at the skin of your eyes and ultimately create wrinkles over time) to create a guideline for your liner. Simply take a piece of Scotch tape and tape it to a clean patch of skin, such as your wrist or hand to weaken the adhesive, then reapply it to the corner of your eye. Apply your eyeliner, following the line of the tape, and repeat on the other eye, reversing the tape. In seconds, you’ll have a perfect eyeliner wing, and you’ll be ready to tackle on the day.